Thursday, December 27, 2012

More Christmas Favors and Gifts

Hello Stampers and Fellow Paper Crafters! 

Hope to find you all had a Merry Christmas. We've had a lot of rain this year but no snow << sniff >>, but fortunately most of our festivities were done the weekend before and it was nice and warm for everyone. 

This year I made cheeseballs and crafts instead of cookies and candies for my Husbands work, our neighbors, friends and family for Christmas.  First I wanted to share the cute little Mail Truck I made using a ScorPal template I found online.  I gave this and a gift card to the nice lady who delivers our mail. Uh, what would she be, our Mail Lady, Mail Person...I don't know!


Below centered is the adorable six pack of Rudolph's I made for my Brother In Law.  I got this idea on Pinterest, and thought it would go perfect with the cheeseball platter I made for my Sis! I would have loved to have done this for my Dad, Brother and Sister who all live out of town and in other states but shipping beer and cheese would have been problematic! So they all got handmade crafts and candy favors instead!   :o(   


I did the same thing here with Coco-Cola's which I packed in a gift basket filled with cheeseball, crackers, nuts and fruit for my Ex In Laws and our Neighbors.  They're so cute and simple, simple to make!!!!


 Ok, that's all for now folks, gotta run, until next time, happy stampin!

Wednesday, December 12, 2012

Christmas Favors and Tree Topper

Hello Stampers and fellow Paper Crafters!

I've been busy busy making cute little Christmas Favors for my Hubby's co-workers and Candy Bar Wrappers for my Step Brother and his Family and now that I have finished I thought would share.

First, these cute little treat holders were made using the largest tag of the Bigz Two Tags die. I attached a punch art Santa and a cute little Rudolph I made using the owl punch. Inside each favor are yummy little truffles wrapped in festive Christmas colors.  Just too cute and the perfect little something to accompany the cheese ball I am sending this year!    


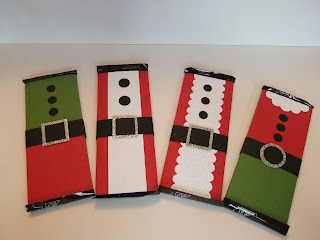
Next are the Candy Bar Wrappers, these were super duper easy and I made them in a Santa, Mrs. Santa and two little Elves!  Real Red, Gumball Green and Basic Black Cardstock were used along with Silver Glimmer Paper for the buckles. 


Finally, my Tree Topper and let me say this picture does not do this thing justice!  This was made using the Holiday Ornaments Framelits and the matching stamp set Ornament Keepsakes.  Real Red and Crumb Cake Ink were used along with Glimmer Paper in Red, Silver and Champagne.   You may have noticed the big beautiful star in Red Glimmer paper, well, I made this 9" lovely using my new Cricut Expression 2, I love this thing!!!


Ok, until next time Folks...Happy Stampin!

Tuesday, November 27, 2012

Winter Thank You Card and Cookie Monster & Elmo Favors

Hello Stampers and Fellow Paper Crafters!

I was commissioned to make several Birthday Cards and Favors for my Sister Lisa and her Mother In Law Yvonne. I was going to share all the Birthday Cards I made but that would have been 15 cards to post, and I would not have been able to give details on the cards, so instead I made duplicates to use myself this coming year for Birthdays and I will post them as I use them.  Now, although I'm not posting all the cards right now, I did want to share the card I made Yvonne for her order which covered both Thank You and Christmas, I would love to say I came up with the design but I didn't, I found this somewhere on pinterest and tweaked it to make it my own. 

I used Crumb Cake for the base, Very Vanilla for the first layer which I put in my printer and printed out "T'was the Night Before Christmas" poem, ran it through the Big Shot with my new Fancy Fan Embossing Folder (Love it!!!). Punch out a snowflake on a 3x3 piece of crumb cake using the retired snowflake punch and finished it off with some adorable hearts punch from red glitter paper; 


Since her's came out a little dark, I thought I would also post the one I made to use as a Christmas Card only difference is I used "Be Merry" from the retired Warm Words stamp set instead. Lovely!


As for the favors, most of the favors I had also made for the craft fair this year so I won't post them again but I did want to share the Elmo favor. I had originally planned to make Elmo for the craft fair to go with Cookie Monster but the pain in my arms just would not allow me at that time! They're so cute together!!! 


Ok, until next time, Happy Stampin'!

Black Friday Front Page News

Hello Stampers and Fellow Paper Crafters!

I sure hope you had a great Thanksgiving Holiday! Eat too much...Shop too much?  
I, myself did not fight the crowds for Black Friday or should I say Black Thursday? Next thing you know, we'll be standing in line to buy Christmas after we take kids trick or treating!  

I know I am showing my age, but I don't like it, I miss the old days when you better get all you need on Wednesday cause' there won't be a store open for miles and miles until Friday morning!  Anyway, I didn't stand in line (I'm more of a Cyber Monday kinda Girl)but my Daughter and her Husband did, here they are on the Front Page of our local paper standing at the front of the line of some store... 

Kim has a big grin on her face, Greg's behind her, crazy kids!  Seriously, it's crazy, look at that line, this is Thanksgiving Day folks, go lay on the couch, spend time with your family...eat some more pumpkin pie!

Ok, until next time, Happy Stampin'!

Monday, November 12, 2012

Roxboro Community School Holiday Extravaganza

Hello Stampers and Fellow Paper Crafters!

Wow, we had such a great time Saturday in Roxboro at the 7th Annual Roxboro Community School Holiday Extravaganza!   This year I was blessed to have two of my dearest friends join me and sell their Fall & Christmas paper crafting favors, gifts and cards!  I also moved to the other side of the school which turned out to be a wonderful location (hope we get it again next year!).  We were right across the hall from the cafeteria and the room where the Silent Auction was taking place.  Loved it!!! 

Although, it was wonderful having our booth situated in a classroom doorway (so much room to walk around) we had planned on setting our tables up against the walls with baskets and boxes to layer our items on, unfortunately we ended up basically laying most of our items flat on the table, but it was all good, and we did very well and sold most of our wares but boy, were we dragging one leg behind us by the end of the day!   

Ok, enjoy the pics Folks, and until next time...Happy Stampin!


Happy Birthday Kimberly!

Hello Stampers and Fellow Paper Crafters!

Just wanted to share the card I made for my Daughter Kim for her Birthday.  Her Birthday was actually this past Friday, she turned 28!!!  Seems like yesterday I was struggling to put shoes on her (she still hates to wear shoes!) I apologize that the pic is so dark, sometimes it's just easier to set up in my craft room instead of dragging my set up into my Dining Room which has the best light in the house! 

Here I used retired In Color Blushing Bride CS and DSP for my base, several punches which includes the adorable Cupcake Builder Punch.  Accent colors would be Pear Pizzaz and Perfect Plum!

Ok, until next time Folks, Happy Stampin!

Monday, October 29, 2012

Sneak Peak of Craft Fair Items

Hello Stampers and Fellow Paper Crafters!

I have been working hard for the up coming craft fair and wanted to give you a quick sneak peak! I still have a few more items to complete and I didn't lay out all the items, figure I could replenish as needed to save on space since I am bringing two other crafters with me this year.  Soooo this is just a smidgen of my work. I will show the entire spread, including the cute, cute, cute projects my friends Carol and Sharon are selling when we get everything set out at the school.


Ok, here you go...from left to right you have:

Gift Card Purses (which I will hand up somehow)
Note Card Holder (have more to make)
Soon to be Gingerbread Treat Holders (want Little Debbie's Gingerbread Men to be fresh)
Christmas Tile Coasters
Cookie Monster Treats
Rudolph Jumbo Candy Bar Sliders
Snowman Candy Bar Holders
Peppermint Pattie Snowmen
Santa Twizzlers
Snowmen Soup Holders
Fox and Friends Notepads
Color Me Snowman Thank You Card Gift Set
Snowman Kisses
Gingerbread Recipe Holders W/Recipe
Santa Gift Boxes   
Oh, and almost forgot my little Christmas Mice up top!


 Thanks for visiting my blog and please try to visit us on November 10, 9am - 3 pm in Roxboro for the 7th Annual Roxboro Community School Holiday Extravagaza!

Ok, until next time...Happy Stampin!

Sunday, October 28, 2012

Halloween Treats

Hello Stampers and Fellow Paper Crafters!

After several weeks of resting my arms and hands, I'm back to my paper crafting just in time for Halloween!  This year I am very, very excited...for the past 10 years we have not had Trick or Treater's and this year a cute little family moved in up the road, so Yippie!  I would have loved to have a little Halloween party for them, but I'm being very careful not to over work my hands so I kept my treats to a just a few. 

Now, I'm sure you've see these little guys before, they're all over Pinterest but just in case you haven't they're made from the scallop circle, 1/2" and 1/4" punches along with the retired corner punch for the legs.  Slap a peppermint pattie between them and you have an adorable spider! 

Remember when you (or you're child) were in kindergarten and you made cute little ghost from tissues (or in this case paper napkins) and tootsie pops?  Well, here is my version of that little craft, I attached little bats (unfortunately this punch is retired also) to a couple of them but quickly decided I liked them better without.  For my mummies, I glued googly eyes to a fun size tootsie roll and wrapped white streamer paper around it, they're so simple but cute! 


Here's the whole gang in my basket, my little spiders, mummies and ghost along with asst candy and some Halloween themed pencils and erasers I picked up at walmart.  I'm so excited, can't wait for the kids to come!


Ok, until next time, Happy Stampin'!


Sunday, October 7, 2012

October Birthday Cards

Hello my Fellow Stampers and Paper Crafters!

Been a couple of weeks since I lasted posted.  I've been busy, busy, busy making my upcoming Craft Fair projects and Birthday Cards for my friends and family and as a result I have caused tendinitis in my forearm and elbow and have had to put everything on hold until it heals.  Lovely! 

So, since it's difficult to type and with every keystroke I literally feel pain, I am going to make this very short and sweet.  Below are the cards I have made for October Birthdays, I will post my Craft Fair projects in the next few weeks, so keep checking back!

Ok, until next time, Happy Stampin!


For my Nephew Aaron (he b-day was actually end of Sept.)

For my Ex-Father-In-Law

For my Step Daughter Jennifer

For my Hubby (btw...he says black smoke is not a good thing) hehe

For my dear friend Sharon

Thursday, September 20, 2012

Papillon Potpourri Thinking of You

Hello Stampers and Fellow Paper Crafters!

Today I'm sharing a card I made for my Sister's Mother In Law who fell and broke her hip this week.  I used my newest stamp set Papillon Potpourri in Perfect Plum. Other tools used were the corresponding Butterfly Punch, scallop Oval and Large Oval punches along with a retired Texturz Plate.  Unfortunately, I took the picture in my craft room so it's not as bright and pretty as it should be, I just love Perfect Plum when paired with B. Black.   Ok, must get this in the mail, it will take about about week to get it to her since she lives in California! 


Ok, until next folks...Happy Stampin'! 

Monday, September 17, 2012

Make & Take at Family Camping Trip

Hello Stampers and fellow Paper Crafters!

I'm just returning from a week long camping trip with about twelve members of my family. We had such a great time and it wonderful to see members who live out of state if only for just a few days.  Of the twelve, seven were ladies and I thought what a great opportunity for a Make & Take!  

As you can see below, I kept it real simple so that I wouldn't have to carry a lot of tools.  For this I cased a lovely Autumn card from Mary at Stampin Pretty and only changed a few things up...I used the lovely Day of Gratitude stamp set from Stampin' Up and instead of real buttons I used my Big Shot and Sizzix Buttons #5 and Early Espresso cs.  The Base is made from Crumb Cake, layered with E. Espresso and Poppy Parade.  Using the 5 petal flower punch for the center flower and Antique Brads to finish it off! The Ladies simply loved it!  


 Ok, until next time...Happy Stampin'!

Saturday, September 8, 2012

Owl Punch Anniversary Card

Hello Fellow Stampers and Paper Crafters!

Today I wanted to quickly share the card I made for my Daughter Kim and her Husband Greg for their 2nd Anniversary.  It is too cute!
Here I used V. Vanilla card stock for my base and layered it with retired dsp (Designer Series Paper) from SU called Timeless Portrait, I just love this paper, it is simply beautiful!  The cute little owls (using our Owl Builder Punch) were punched from River Rock cardstock and the little leaves were punch from Basic Black cs using our Bird Builder Punch. The little hearts and the little owl girl's bow were also punch from the Owl Builder punch.  If you look real hard you can see the bow is made from two hearts, too cute!

Ok, until next time...Happy Stampin'! 

Staley Memorial Bake Sale Donation

Hello Fello Stampers and Paper Crafters!

Below is the donation I made to this years Children's Church's Bake Sale. They're so cute!

Of course I used the Top Note die along with my handy dandy Big Shot to make the owl's face and used assorted punches for the eyes, the little beak is from the 5 petal punch and the little "feet" (would that be claws) were also punched from Pumpkin Pie card stock with the Blossom Punch. Too Cute!!!  Inside the cello bag is my version of chex party mix (minus the chex) using Cheezit's, Bugles, mini pretzels and peanuts all sprinkled with ranch dressing mix, YUM!

Well, I sure hope they are successful today, not only are they having the bake sale but the elders of the church are having a yardsale and the children are offering a carwash.  If you find yourself down that way
(1446 North Graham-Hopedale Rd., Burlington, NC 27217) please stop in and visit and don't forget to grab some of my yummy party mix!

Ok, until next time...Happy Stampin'!

Sympathy Cards for my Cousins

Hello fellow Stampers and Paper Crafters!

Last week we lost my Uncle Charles, one of my Mother's Brothers.  He will be greatly missed by his Family and his Church but we all know he's in a better place.  I made cards from us "Cooley Kids", that's what everyone still calls us although the youngest of us is way into her 40's.  :o)  Anyway, below is the pic I made for our Cousin Tim and his wife:

I kept this card pretty simple since it was mainly for Tim, I used Early Espresso for my base, Always Artichoke for the first layer followed up with Paisley Petals dsp (retired).  The Stamp is from the set called Four Frames which corresponds with the Decorative Label punch . I also punch three little blossoms in E.Espresso from the Boho Blossom punch with a center of Marina Mist.  This is one of those cards you had to see in person, a picture just doesn't showcase it very well!  


For my Cousin Deborah we wanted something a little softer so again I used retired dsp Paisley Petals ( I just love all the colors this designer paper has) and Early Espresso for the base.  For the layer, Whisper White cs was embossed with the Vintage Wallpaper folder. To finish it off I stamped another one of the stamps in the Four Frames set with Marina mist and wrapped it all up in a pretty little bow using our 5/8 Organza Ribbon. (As always just click on pic for a closer view of the detail on this card!) 

Ok, until next time folks... 

Thursday, August 30, 2012

Mickey and Minnie Birthday Card

Hello Stampers and fellow Paper Crafters!

One more Disney card to share.  This request was for Mickey and Minnie in a landscape with clouds and Cinderella's Castle in the background! 

I began by punching out the parts for the castle, but after punching and punching and working and working I just couldn't get a castle I liked, just couldn't get a small enough image to work as a background. So, after much thought I decided to try and pull a digital image off the web and see if I could make my card a hybrid instead.  Once I did; it all seemed to fall in place.  Using circle punches for Mickey and Minnie, then the Cupcake Builder Punch for the clouds and finally using the masking technique I sponged the background in Marina Mist, Old Olive and for the Sun, More Mustard.  I think it looks GREAT! 


Ok, until next, Happy Stamin'!

Wednesday, August 29, 2012

Minnie Mouse in Pretty In Pink

Hello Stampers and fellow Paper Crafters!

When my Daughter called yesterday asking if I would make a card for a friend who's wife is a big fan of Disney, I racked my brain and finally hit the web trying to find punch art of a sweet little Disney Princess, couldn't find a thing I liked.  So I thought about a card I saw on Pinterest with Minnie Mouse and decided that would be the best to way to go.

For this card I just about CASED it to completely except for the bow which I made from scratch with card stock.  I got the idea from the cover page of our new SU Catalogs, love it, love it, love it!!! For the card base I used Basic Black and layered Pretty in Pink on top embossing with the retired Backgrounds Texturz plate.  To make little Minnie's silhouette I used 3/4" and 1/2" circle punches and made the bow from the Owl and Cupcake Builder punches. I think it would look better had I put the ears in front it almost looks like Minnie has no face, lol  but I think it's just adorable and can't wait to show my Daughter! 
Don't forget to click on pic for a closer look!


Ok folks, back to my Craft Fair projects...until next time, Happy Stampin'!

Monday, August 27, 2012

August Birthday Cards

Hello there fellow Stampers and Paper Crafters!

WOW!  Has it been a month since my last post???  Where has the month gone? Really where has the year gone, it's almost September? (!!!) 

So, now I am finally getting around to posting cards for my August Birthdays, except one, looks like I  mailed my good friend Lisa's B-Day card before getting a picture of it, but it was lovely and match her to a tee!  No fear, I did get the other two cards and will post them right now!  :O) 

This card was one I made in one of the classes I attended a few weeks back and is for my Hubby's sweet Aunt Betty, she is a sweetheart and we love her very much!  This pretty card uses Concord Crush and Perfect Plum CS along with C.Crush and Pear Pizzaz Inks.  Vintage Vogue stamp set was used and  unfortunately this set is no longer available, sure wish I had it, Love it!


Next card is for my Brother In Law Johnny, his Birthday is actually today, and as usual I forgot to mail the card, so he will get it late, hehe!  I used my most favorite manly stamp set, The Open Sea.  Crumb Cake, Red Riding Hood an Very Vanilla CS and ink was used.  Can you see the Striped embossing folder I used?  It's really great for a lot of different projects but especially for a masculine card.


Ok guys, that's it for now.  Hopefully it want be soooo long for my next posting!  Happy Stampin!

Friday, July 20, 2012

Finally! Cutting Station for my Craft Room!

Hello fellow Stampers and Paper Crafters! 

Finally, finally, finally I have the Cutting Station I was looking for!  I had a very complex sizing to find...height, length, width and depth of the drawers had to all be taken into consideration! You would not believe how long we have looked for just the right size piece of furniture for this station.  And finally...my dear Hubby found this ugly old thing one day as he was out and about and snatched it right up for me!  Very little repair was needed just a good paint job to match my cabinets.  This is perfect for me to put all my cutting tools, papercutter and trimmers in along with my Big Shot dies and accessories, love it!!!     


Create A Cupcake Class

Hello Fellow Stampers and Paper Crafters:

Yesterday I had my Create A Cupcake class and we had such a blast!  The girls made an Awning Card along with a matching matchbox which showcased the stamp set Create A Cupcake with the coordinating Cupcake Builder Punch. They also made an adorable gift bag with voltive candles we made using the tissue paper technique.  As with all my post; just click on the picture and you can usually get a larger view.


Cardstock: Perfect Plum and Blushing Bride
Ink: Perfect Plum, Blushing Bride and Early Espresso
Tools and Accessories: Fancy Favor box die, Stripe EF with The Big Shot and Cupcake Builder Punch 


Create A Cupcake Stamp Set  with Coordinating Builder Punch, Too Cute!!!


Ok, until next time, Happy Stampin!